This tutorial requires basic Blender knowledge and Node Editor knowledge. For those just starting Blender, I recommend CG Cookie’s Blender Basics. You can watch them at http://cgcookie.com/blender/cgc-courses/blender-basics-introduction-for-beginners/
So, the other day, I was working on a project that needed mysterious, wispy smoke. At first, I tried to set up a Smoke Simulation, but that wasn’t working out. I couldn’t get detailed thin smoke. I just got thick, dense smoke. The simulator having failed me, I turned to a procedural material. I opened up the node editor and within six minutes, I churned out great looking wispy smoke:

It was super simple and all in the node editor. So, here goes this brief tutorial.
I am using Node Wrangler addon shortcuts. You can enable them in User Preferences > Addons > Node Wrangler:
1. Launch Blender. Change the render engine to Cycles. Delete the default point lamp. Change the Background color to Black (You can find this in the World settings tab of the Properties panel). Scale the default cube in Edit mode by five.

2. Create a new material for the cube. Call it something like “Wispy_Smoke.” Go into Camera View in the viewport (Numpad 0). Split your view and make the top view the Node Editor. Switch to Material nodes.

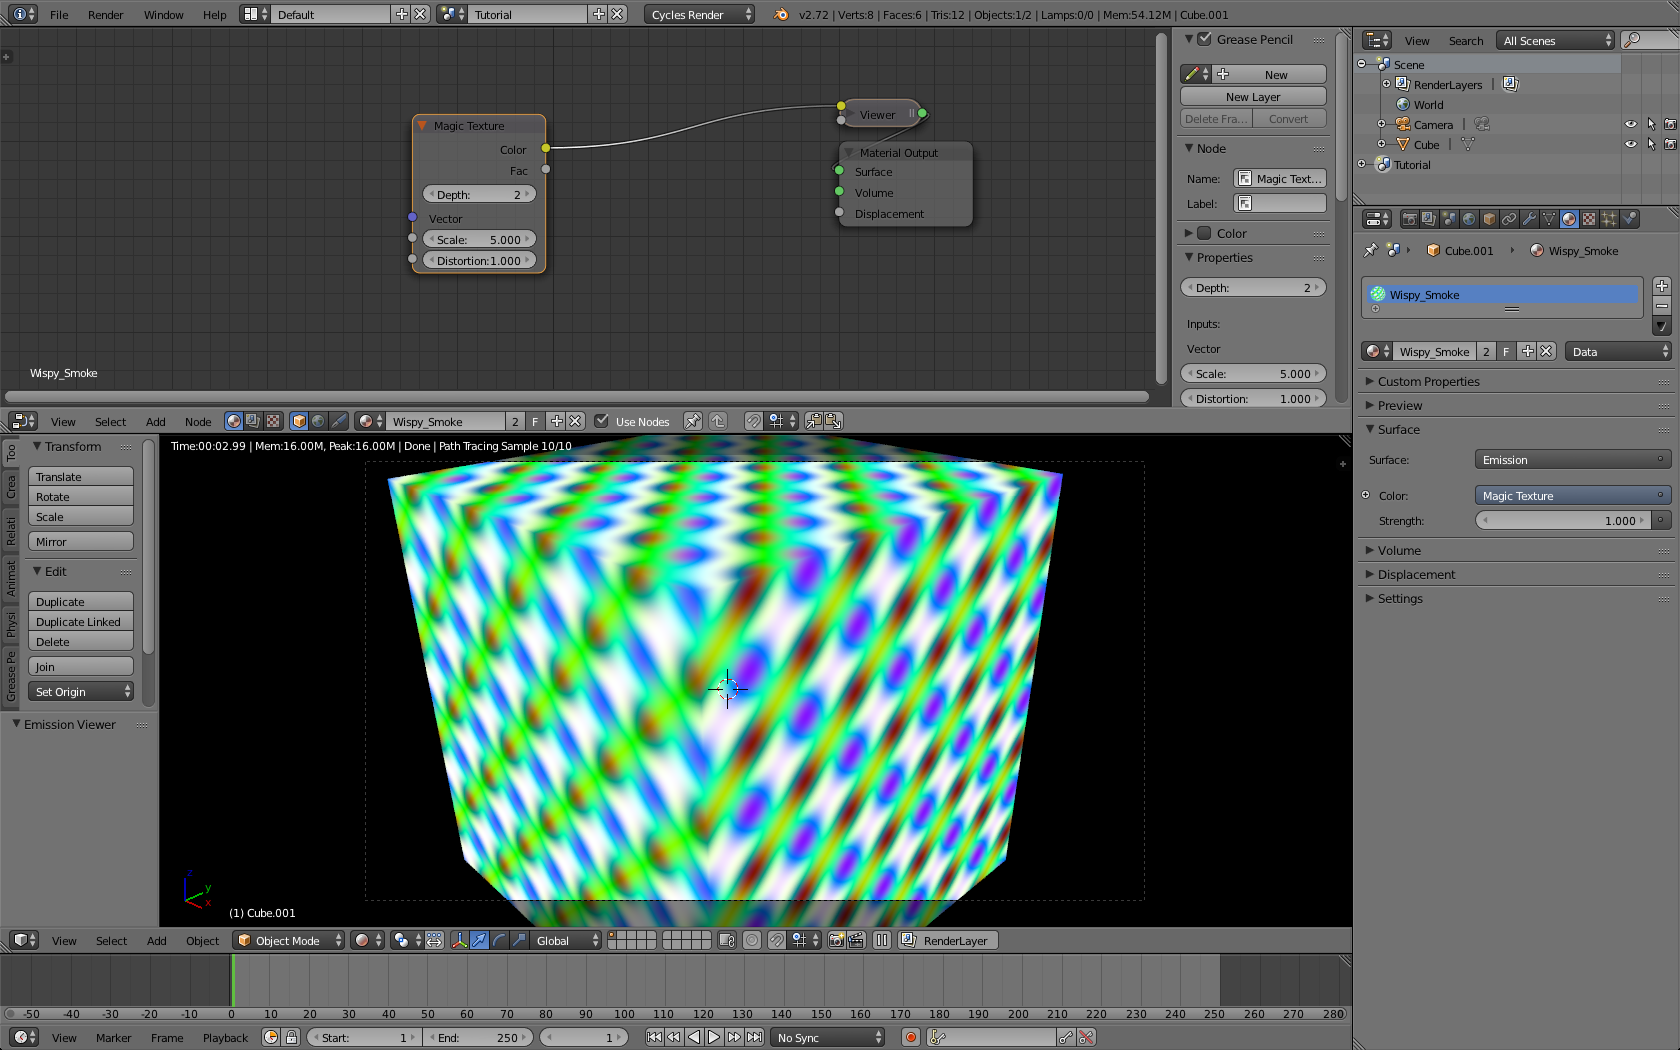
3. We want to get a swirly type of texture. Add a Magic Texture to the editor (Shift-A, Texture > Magic Texture). Delete the Diffuse BSDF texture and Ctrl-Shift-Click on the Magic Texture to preview it. Switch to Rendered mode in your viewport to see the texture.
4. We just want a black-and-white texture, though, so Ctrl-Shift-Click on Magic Texture again to preview the Fac output. Since smoke is created with Volumetrics, we need to plug the Viewer Node into the Volume socket, instead of the Surface socket. Drag the noodle (the line that connects the nodes) from the Surface Output to the Volume Output.

5. After doing this, we can see that it is just too bright. There are too many layers building up through the cube, and they are all too bright. To fix this, add a ColorRamp node (Shift-A, Converter > ColorRamp), and place it in between the Magic Texture and the Viewer Node. Move the Black flag up to around 0.7. Then lower the value of the White flag by dragging down the slider next to the color wheel. Set the value at about 0.015. We then get a bunch of blurry gray lines.

6. This is an improvement! It looks like smoke! Although it isn’t what we are going for yet, we can now more clearly see all of the changes we make. Now that we can see our texture, let’s start playing around with its settings. The magic texture has two settings that we will play with today: Depth and Distortion.
7. If we increase the depth to four, for example, we see that it becomes more detailed, which is what we want. However, the distribution of the new detail is much too uniform. If we look back at our final image, then we see that some places are lumpy, while others appear very stretched and twisty.

8. Now, let’s look at the other parameter: Distortion. To appreciate what the distortion feature does, we should preview our texture without the color ramp, and just on the surface. Ctrl-Shift-Click on the Magic Texture to preview the color texture on the surface.

9. Now we can change the distortion parameter. Try changing it to five. We can see that it becomes swirlier. This is what we need to change. Again, though, the distribution is too uniform and wouldn’t make good smoke.

10. Now that we have seen the effects of changing both parameters, we can apply this knowledge to creating our smoke. Let’s get back to the setup that we had before. Ctrl-Shift-Click on the ColorRamp to connect it to the viewer node. Then, using Ctrl-Drag, disconnect the Viewer node from the Surface output, so that it is only attached to the Volume output.

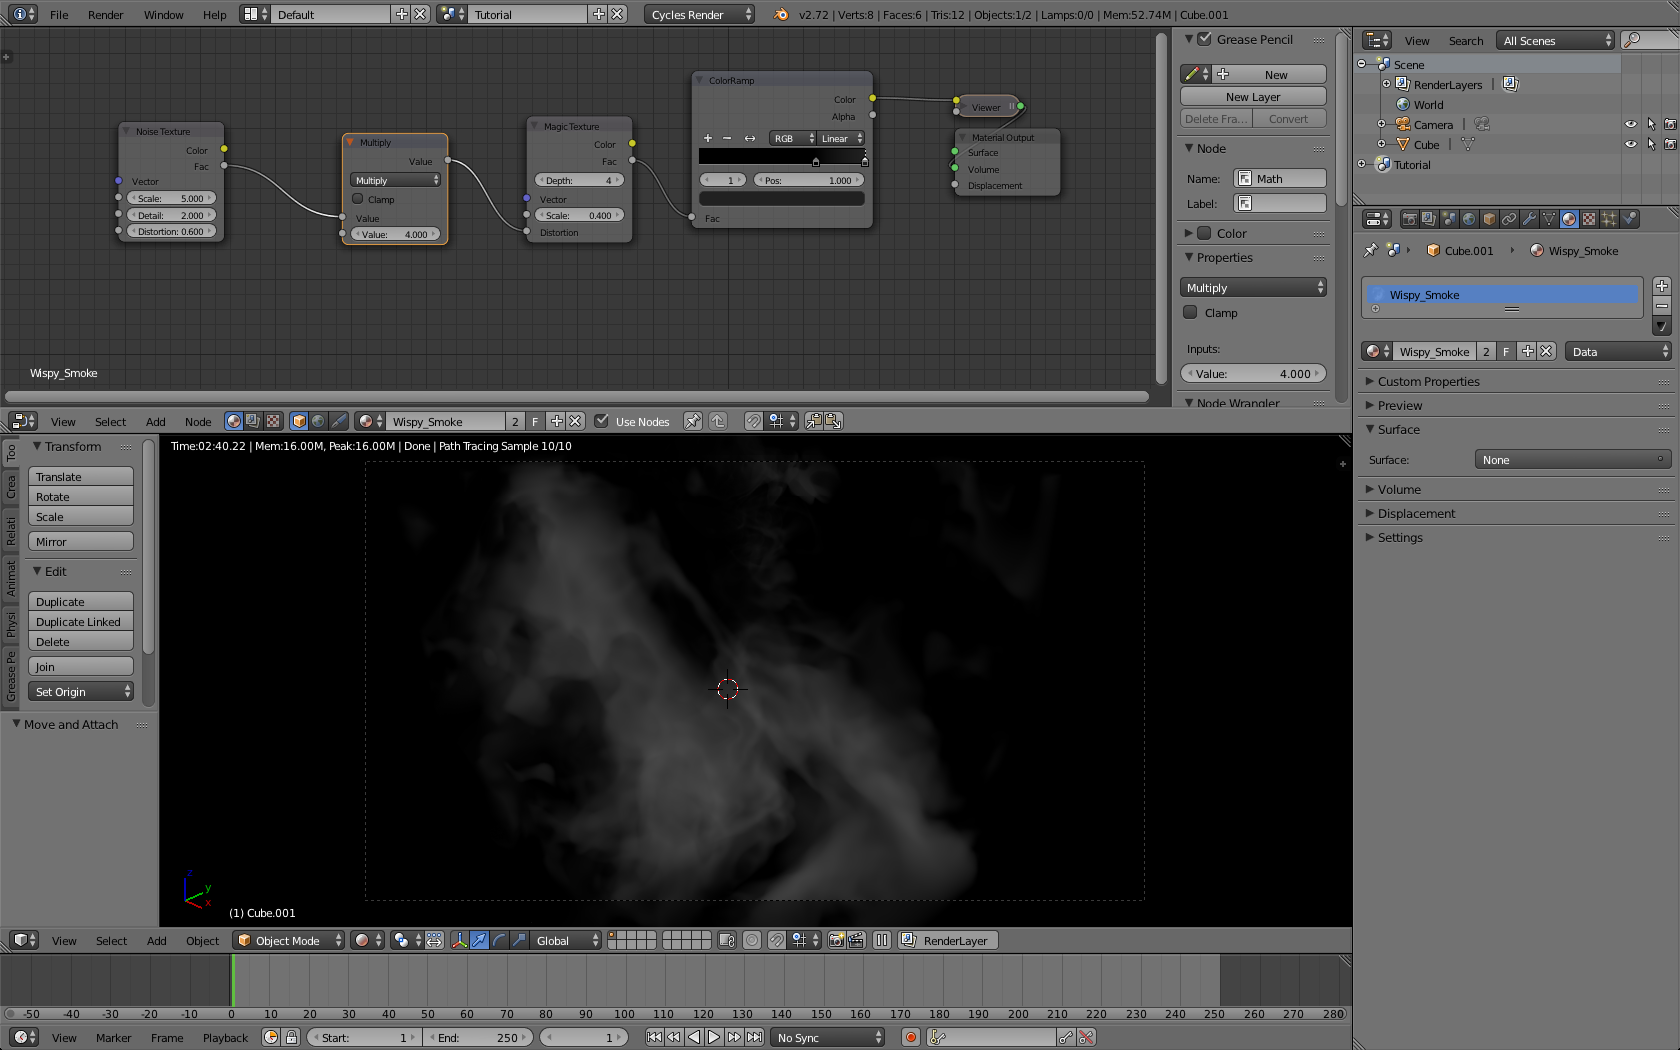
11. We are now set up. First set the scale of the Magic Texture to 0.4. Next, to non-uniformly distort our Magic Texture, add a Noise Texture (Shift-A Texture > Noise Texture. Set the distortion of the Noise Texture to 0.6. Then, plug the Fac output into the Distortion input on the Magic Texture. Now we are starting to see some wispy smoke.

12. To complete the look of our smoke wisps, let’s increase the distortion. Add a Math node, (Shift-A, Converter > Math) and put it in between the Noise Texture and the Magic Texture. Set the second input to four. We should now have some great looking smoke.
13. There are a few optional things that we can do to finish up our smoke. First, the Viewer node is just an Emission shader, so we can delete the Viewer node and add and Emission shader in its place. Plug the ColorRamp output into the Strength input on the Emission node. Second, the measurements used are for a cube 10 bu (Blender Units) by 10 bu. These might change for a smaller or larger object. To fix this, add some texture coordinates (Shift-A Input > Texture Coordinate). Connect the Generated output to the Vector input of the Magic and Noise Textures. Add a Mapping node (Shift-A Vector > Mapping), and place it between the Texture Coordinates, and the Vector inputs on the Noise and Magic Textures. You can adjust the scale to change the size.

Bonus: Here are instructions for wrapping this up into a Node Group.
1. Press A, then B and drag to select all of the nodes except for the Output node. Press Ctrl-G to group them. In the panel on the left of the Node Editor (if you don’t see it, press N to bring it up), select the green dot in the Output column at the top and rename it “Volume,” underneath the table.

2. Now we need to create some exterior controls. First, let’s add exterior controls for the Scale. Since texture coordinates are just color data, we can use an RGB multiply node. (For more on why that works, see this video by Bartek Skorupa: http://goo.gl/C0tNdf). Switch the Mapping node to a MixRGB node (Shift-S Color > MixRGB), and change it to Multiply. Set the Fac to 1. Next, take the second input of the Multiply node and drag it to the Group Input node. In the right panel, rename it to Scalar Vector. Set the defaults all to 1. Leave the min at 1 and change the max to a 1 with about thirty seconds of zeros after it. This will change it to read inf, or infinity.

3. We can also add other inputs, like distortion. Drag a noodle from the second input socket of the Multiply node to the Group Input node. In the right panel, name it Large Distortion. Then, drag a noodle from the Distortion input on the Noise Texture to the Group Input node. Name it Fine Distortion.

4. Lastly, although this smoke shows up great on a black background, it might not show up as well in another project where its surroundings aren’t completely black. Select the ColorRamp and hit Ctrl-Shift-D. Move the new ColorRamp right below the first one. Change the second flag to pure white. Add a MixRGB node (Shift-A Color > MixRGB). Plug both ColorRamps into the two color inputs. Set the Fac to zero. Drag the Fac on the MixRGB node to the Group Input node. Name the new input Smoke Density. For use with other nodes, drag the output of the MixRGB node to the Group Output node. Name the output Smoke Fac. Just for fun, drag the Color input on the Emission shader to the Group Input node and name it Smoke Color. Tab out of it, give your node group a name, and you are good to go!

Node Setups and Renders:


